Core Image is a powerful framework for image processing and analysis technology designed to provide real-time processing for still and video images. This helps you easily apply filters to images, such as modifying the hue, exposure or vibrant. It uses the GPU or CPU rendering path to process the image data very fast.
Core Image can be chained with multiple filters to an Image or video frame at once by creating custom effects. Core Image provides us more than 90 built-in filters on iOS and over 120 on OS X. You can set up filters by supplying key-value pairs for a filter’s input parameters. You can use the output of one filter as the input of another filter, to create amazing effects.
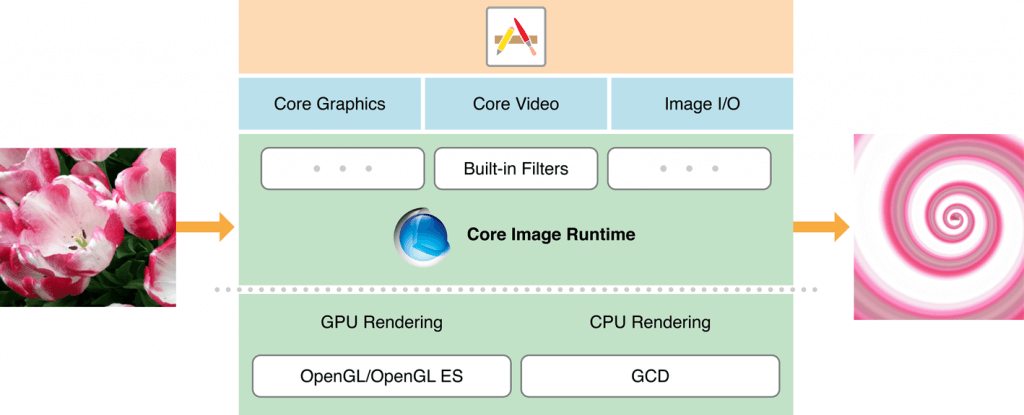
Here is how the Core Image is related to the iOS operating system
Before going into Core Image, let’s know about the classes used in the Core Image framework:
Contents
CIContext:
The CIContext is a class which provides an evaluation context for rendering a CIImage object. CIContext class is used to take advantage of the built-in Core Image filters while processing an image.
CIImage:
The CIImage is a class which represent an image or holds an image data which may be created from a UIImage, from an image file, or from pixel data.
CIFilter:
The CIFilter class produces a CIImage object as output. A filter takes one or more images as input. The filter class has a dictionary that defines the attributes,so the parameters of a CIFilter object are set and retrieved through the use of key-value pairs. This helps us to add some beautiful effect on the input image.
Sample example:
In this example local image path is used in resource file to apply effects.
// 1 Retrieving the localimage.png path from resource bundle
NSString *filePath =
  [[NSBundle mainBundle] pathForResource:@"localimage" ofType:@"png"];
NSURL *fileNameAndPath = [NSURL fileURLWithPath:filePath];
// 2 Converting the normal image to CIImage object by passing the URL of original localimage.png
CIImage *beginImage =
  [CIImage imageWithContentsOfURL:fileNameAndPath];
// 3 Adding the filter SepiaTone effect to the localimage.png
CIFilter *filter = [CIFilter filterWithName:@"CISepiaTone"
                              keysAndValues: kCIInputImageKey, beginImage,
                    @"inputIntensity", @0.8, nil];
CIImage *outputImage = [filter outputImage];
// 4 showing the output image in the UIImageView
IImage *newImage = [UIImage imageWithCIImage:outputImage];
self.imageView.image = newImage;
Note : Here we can change the value of the CIFilter value which is given 0.8 by using a slider which min value is 0 and max value is 1.
Here we have not used the CIContext to perform an CIFilter as said earlier. It helps us to make it easier.
Lets change the above code to include the CIContex:
CIImage *beginImage =
[CIImage imageWithContentsOfURL:fileNameAndPath];

// 1
CIContext *context = [CIContext contextWithOptions:nil];

CIFilter *filter = [CIFilter filterWithName:@"CISepiaTone"
keysAndValues: kCIInputImageKey, beginImage,
@"inputIntensity", @0.8, nil];
CIImage *outputImage = [filter outputImage];

// 2
CGImageRef cgimg =
[context createCGImage:outputImage fromRect:[outputImage extent]];

// 3
UIImage *newImage = [UIImage imageWithCGImage:cgimg];
self.imageView.image = newImage;

// 4
CGImageRelease(cgimg);
Let’s see what happened here:
Here we set up the CIContext object. The CIContext takes an NSDictionary that specifies options including the color format and whether the context should run on the CPU/GPU. Here the default values are fine and so you passed as nil for that argument.
Here we used an method on the context object to draw a CGImage. Calling this method createCGImage:fromRect: on the context with the supplied CIImage will give us an output as CGImageRef.
Next, we converted the CGImage to UIImage using “imageWithCGImage”.
At last we release the CGImageRef as CGImage. CGImage is a C API which need to free memory even it runs with ARC.
Note: To know about all available filters write the following code and call the method in viewDidLoad / onLaunch. The filters are written on the console log.
-(void)logAllFilters {
NSArray *properties = [CIFilter filterNamesInCategory:
kCICategoryBuiltIn];
NSLog(@"%@", properties);
for (NSString *filterName in properties) {
CIFilter *fltr = [CIFilter filterWithName:filterName];
NSLog(@"%@", [fltr attributes]);
}
}
Like this blog? I’d love to hear about your thoughts on this. Thanks for sharing your comments.


