Contents
What Is In App Purchase?
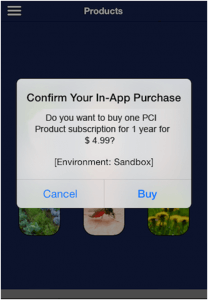
Apple’s In-App purchase lets you the ability to sell items within your free or paid app which includes premium content, virtual goods, upgrade features and subscriptions. Apple takes 30% of the commission and you receive 70% of the purchase price.
Each purchase is associated with a product type. The product types are:

Consumable Products:
Consumables are In-App Purchases that must be purchased each time the user needs that item.
-
Non-Consumable Products:
Non-Consumables are In-App Purchases that only need to be purchased once by the user and are available to all devices registered to a user.
-
Auto-Renewable Subscriptions:
Auto-Renewable Subscriptions allow the user to purchase episodic content or access to dynamic digital content for a set duration time. At the end of each duration, the subscription will renew itself, until a user opts out.
-
Non-Renewable Subscriptions:
Non-Renewing Subscription allow the sale of services with a limited duration. Non-Renewing Subscriptions must be used for In-App Purchases that offer time-based access to static content.
-
Free Subscriptions:
Free Subscriptions are an extension of Auto-Renewable Subscriptions that permit the delivery of free subscription content to Newsstand-enabled applications.
Never miss an update from us. Join 10,000+ marketers and leaders.
The Free Subscription In-App Purchase type is implemented in the same way as an Auto-Renewable Subscription, just without any charges to the user. Free Subscriptions do not have expiration, but the user can turn off the subscription at any time.
You can use any one of the above as best suit to your application.
For example, integrating InApp purchase for Non-consumable type product.
In Non-consumable products type, user has to pay only once. Then the content or items will be available to all the device against that user’s apple ID.
What To Do Before Integrating In App Purchase To Your Application?
- Connect to iTunes
- Then create an unique App ID for your application and enable in-app purchases for that.
- Update the app with created bundle ID and code signing in Xcode with corresponding provisioning profile.
- Create the app using the AppID you’ve registered. Then goto Manage Applications in iTunes Connect.
- Make sure you have set up the bank details for your app as it is necessary for supporting In-App purchase.
- Then Add a new non-consumable product for In-App purchase.
- Last step is to create a test user account using Manage Users option in iTunes connect page of your app.
Lets write the code
First include StoreKit Framework into the app.Then write the following code in ViewController.h file
#import <UIKit/UIKit.h>
#import <StoreKit/StoreKit.h>

@interface MyViewController : UIViewController
<SKProductsRequestDelegate,SKPaymentTransactionObserver>

{

}
-(IBAction)PurchaseButtonClicked:(id)sender;

- (void) completeTransaction: (SKPaymentTransaction *)transaction;
- (void) restoreTransaction: (SKPaymentTransaction *)transaction;
- (void) failedTransaction: (SKPaymentTransaction *)transaction;

@end
Write the following code in ViewController.m file
-(IBAction)PurchaseButtonClicked:(id)sender {
    SKProductsRequest *request= [[SKProductsRequest alloc]
initWithProductIdentifiers: [NSSet setWithObject: @"your_product_ID"]];
    request.delegate = self;
    [request start];
}
- (void)productsRequest:(SKProductsRequest *)request didReceiveResponse:(SKProductsResponse *)response
{
   [[SKPaymentQueue defaultQueue] addTransactionObserver:self];

   NSArray *myProduct = response.products;
   NSLog(@"%@",[[myProduct objectAtIndex:0] productIdentifier]);

   //Since only one product, we do not need to choose from the array. Proceed directly to payment.

   SKPayment *newPayment = [SKPayment paymentWithProduct:[myProduct objectAtIndex:0]];
   [[SKPaymentQueue defaultQueue] addPayment:newPayment];

   [request autorelease];
}

- (void)paymentQueue:(SKPaymentQueue *)queue updatedTransactions:(NSArray *)transactions
{
 for (SKPaymentTransaction *transaction in transactions)
   {
      switch (transaction.transactionState)
      {
         case SKPaymentTransactionStatePurchased:
              [self completeTransaction:transaction];
              break;
         case SKPaymentTransactionStateFailed:
              [self failedTransaction:transaction];
              break;
         case SKPaymentTransactionStateRestored:
              [self restoreTransaction:transaction];
         default:
              break;
      }
    }
}

- (void) completeTransaction: (SKPaymentTransaction *)transaction
{
    NSLog(@"Transaction Completed");
    // You can create a method to record the transaction.
    // [self recordTransaction: transaction];
    // You should make the update to your app based on what was purchased and inform user.
    // [self provideContent: transaction.payment.productIdentifier];
    // Finally, remove the transaction from the payment queue.
    [[SKPaymentQueue defaultQueue] finishTransaction: transaction];
}

- (void) restoreTransaction: (SKPaymentTransaction *)transaction
{
    NSLog(@"Transaction Restored");
    // You can create a method to record the transaction.
    // [self recordTransaction: transaction];
    // You should make the update to your app based on what was purchased and inform user.
    // [self provideContent: transaction.payment.productIdentifier];
    // Finally, remove the transaction from the payment queue.
    [[SKPaymentQueue defaultQueue] finishTransaction: transaction];
}

- (void) failedTransaction: (SKPaymentTransaction *)transaction
{
    [activityIndicator stopAnimating];
    if (transaction.error.code != SKErrorPaymentCancelled)
    {
      // Display an error here.
      UIAlertView *alert = [[UIAlertView alloc] initWithTitle:@"Purchase Unsuccessful"
      message:@"Your purchase failed. Please try again."
      delegate:self
      cancelButtonTitle:@"OK"
      otherButtonTitles:nil];
      [alert show];
      [alert release];
     }

    // Finally, remove the transaction from the payment queue.
    [[SKPaymentQueue defaultQueue] finishTransaction: transaction];
}
That’s it, now your app is integrated with the inApp purchase with non-consumable subscription.
Note: Please review Apple Guidelines (https://developer.apple.com/appstore/resources/approval/guidelines.html) before publishing the app to the app store.
Andolasoft has expertise in iOS application development and other iOS integration.
See Also: E-Signature SDK for iOS App Developer


